Before you buy: match the unit to the sink
Disposals are rated by motor size, usually a half to three-quarters horsepower for a household kitchen. Bigger motors grind more but cost more and take up more room under the sink. Check the cabinet depth, because a tall unit can crowd the trap.
Look at your wiring too. If a switched outlet already sits under the sink, you can use a cord kit. If there is no outlet and no switch, the project jumps from plumbing to new electrical work, which is a different trade.
Tools and parts to gather
Lay everything out on a towel before you start so you are not hunting mid-job with the sink in pieces.
- Disposal and mounting kitThe unit usually ships with the mounting ring, snap ring, gasket and discharge elbow. Read the manual, since brands differ.
- Plumber's puttySeals the sink flange. Plumber's putty is the usual choice for the flange of a stainless sink, but follow your manual for stone or composite.
- Basic hand toolsScrewdrivers, adjustable pliers, a hammer, a bucket and a flashlight. A hacksaw may be needed to trim the trap arm.
- Power cord kit or wire nutsNeeded if the unit does not come with a cord, along with a strain relief connector.
- Voltage testerA non-contact tester confirms the circuit is dead. Do not rely on the wall switch alone.
The install, in order
These steps fit a standard stainless sink with a single drain. Double-bowl sinks add a tailpiece and trap, covered below.
- Cut the power at the breakerTurn off the circuit, flip the switch to check nothing runs, then use a voltage tester at the outlet or junction. Tape over the breaker so nobody turns it back on.
- Remove the old drainPut a bucket under the trap, loosen the slip nuts and pull the trap, tailpiece and old flange. Scrape off dried putty so the sink surface is clean.
- Set the new flangeRoll a rope of plumber's putty under the flange lip, press it into the drain opening and tighten the mounting ring from below until putty squeezes out. Wipe the excess.
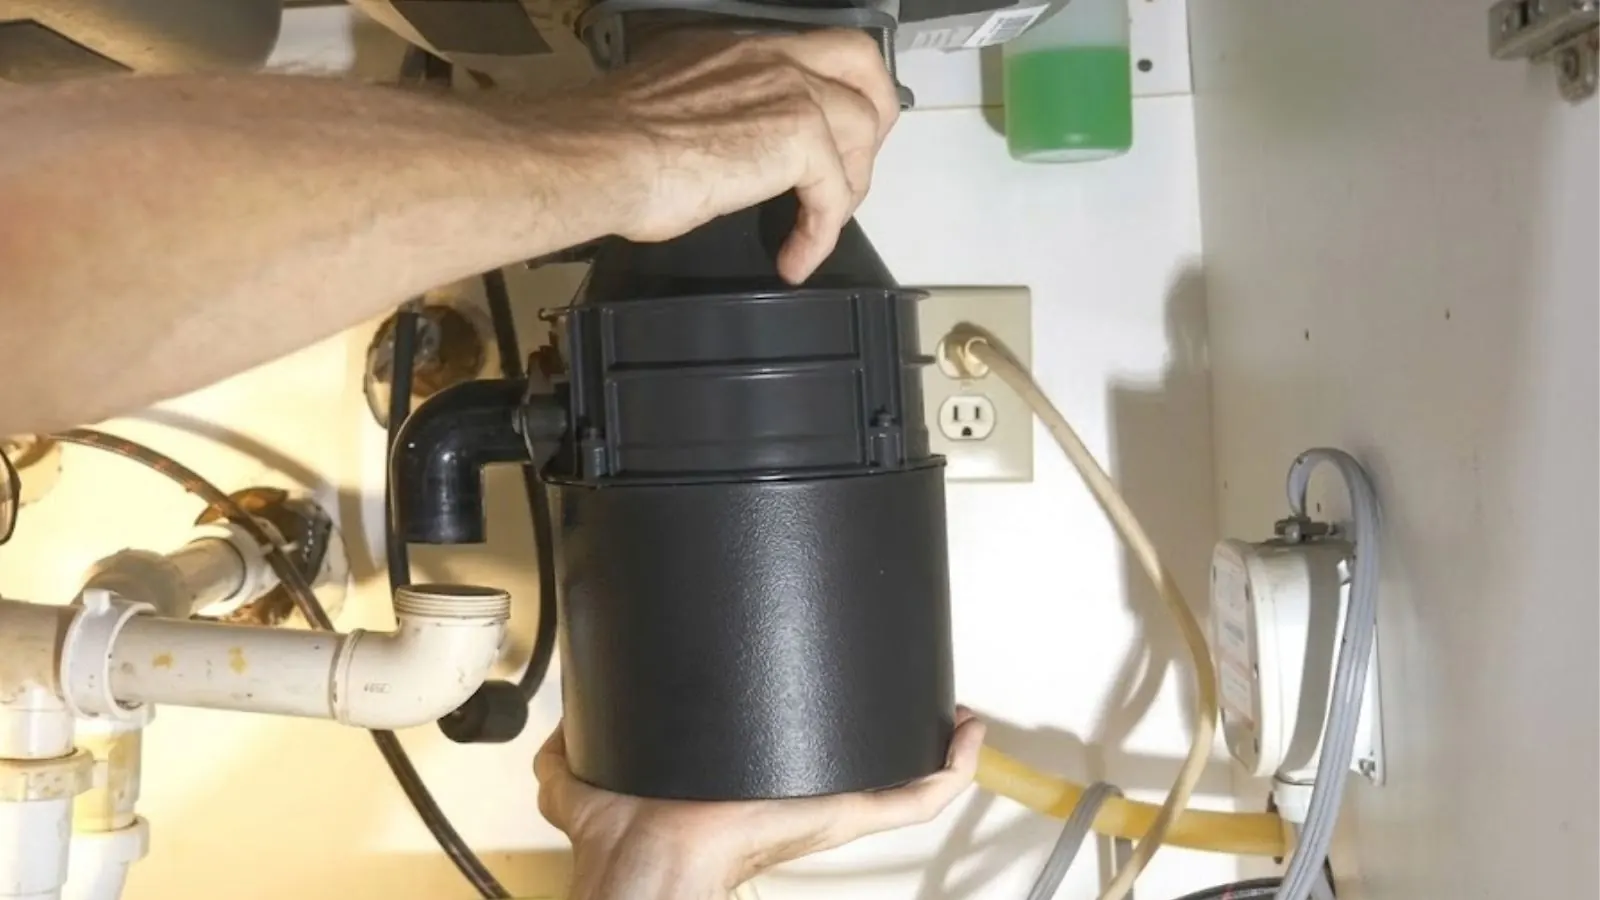
- Hang the disposalLift the unit to the mounting ring and lock it in place. Rotate it so the discharge outlet lines up with your drain line.
- Remove the knockout plug if you have a dishwasherFind the dishwasher inlet on the side of the disposal and drive the plastic plug out with a screwdriver and hammer, then fish the loose piece out of the grinding chamber. Skip this and the dishwasher will not drain.
- Connect the drain and dishwasher hoseAttach the discharge elbow with its gasket, then connect the trap. Clamp the dishwasher hose to the inlet and route it in a high loop under the counter, or into an air gap if your sink has one.
- Wire itWith the power still off, connect the cord or the house wires to the unit's terminals, color to color, and secure the cover plate. Do not leave bare wire outside the box.
- TestRestore power, run cold water and flip the switch. Check every joint with a dry paper towel for drips, and run the dishwasher briefly to prove the plug is out.
Mistakes that cost people a second trip
The big three are the forgotten knockout plug, a dishwasher hose connected without a high loop, and a loose snap ring that lets the unit sag and leak at the gasket. Also avoid hot water during grinding. Run cold, which keeps fats solid so they flush through instead of coating the drain.
Electrical safety and the limits of DIY
Water and mains power share the same cabinet, so treat the circuit as live until you have tested it dead. If you are adding a new outlet, running a new circuit or changing the panel, that is electrical work and belongs with a licensed electrician.
Replacing a failed unit with an existing, working connection is a more modest job. If anything about the wiring looks scorched, brittle or unclear, stop and call a professional. Our garbage disposal repair and installation team can do the plumbing and tell you plainly when an electrician is needed.
When to hire a licensed plumber
Some installs are straightforward, and some are not. Use this to decide.
| Situation | Do it yourself? | Why |
|---|---|---|
| Swapping a similar unit, existing outlet | Often yes | Same connections, same trap layout |
| Double-bowl sink, second drain | Maybe | Extra tailpiece, trap and sloping to get right |
| No outlet or switch under sink | No, call an electrician | New circuit is electrical work |
| Corroded or leaking drain pipe in the wall | Call a plumber | The problem is behind the cabinet |
| Rented home | Ask the landlord | Alterations may need written permission |
| Disposal installed to replace a failed one that clogged repeatedly | Call a plumber | The drain line may be the real fault |
If you hire out, check the company on the California Contractors State License Board site for a C-36 Plumbing Contractor classification. Our plumbing installation page lists related fixture work.
After the install: habits that protect the drain
Feed food waste in small amounts with cold water running. Keep grease, coffee grounds in bulk, bones, fibrous scraps like celery and starchy peels such as potato out of the unit, because those clog the trap downstream. Run water for several seconds after the grinding stops so the pipe clears.
If you hear a hum with no spin, the unit is jammed. Cut power, use the hex wrench in the bottom socket to free it, and press the reset button. A leak at the bottom or a unit that trips the breaker repeatedly means a repair call.
Huntington Park kitchen and permit notes
About 73 percent of occupied homes in Huntington Park are rented, so many readers do not own the sink. If you are a tenant, get the landlord's approval in writing before you swap any plumbing, and let them choose the unit. An unapproved install can become a deposit dispute.
Permit rules vary, so ask the City of Huntington Park building department before work starts. Hard water is also a factor: the city's 2025 report lists groundwater at 214 mg/L and MWD water at 235 mg/L, so expect scale on the flange and splash ring over time. Nearby, our teams cover South Gate and Bell for the same kind of kitchen jobs.
For the code side, the California Plumbing Code (UPC based) is the standard plumbers in the state work to, and a contractor needs a C-36 plumbing license from the CSLB to do this work.
Questions readers ask
If you are replacing a unit and the wiring is already in place, many homeowners can. The risk points are shutting off and testing the power, sealing the flange and removing the dishwasher knockout plug. If you need new wiring or the drain looks damaged, hire licensed help.
The most common cause is the dishwasher knockout plug still sitting in the disposal inlet. Shut the power off, remove the dishwasher hose, knock the plug out and fish it from the chamber. Check that the hose has a high loop and is not kinked.
Many units use a cord into a switched outlet, while others are hardwired. Either way the circuit must be safe and properly protected. If neither exists, ask a licensed electrician to add it before the disposal goes in.
Homes in Huntington Park are on the city sewer system as far as we know, but ask the City Water and Sewer Division if you are unsure. Whatever your system, grease and fibers still cause clogs, so scrape plates and avoid pouring fat down the drain.
A hum means a jam. Cut power, free the blades with the hex wrench and press reset. If the breaker still trips, the motor or wiring may be failing, and it is time for a repair or replacement visit.